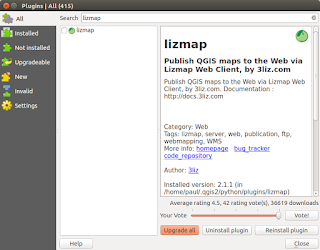
This post follows on from my previous three (most recent first in list) linked below.
There is no doubt that in just a short time from now we will probably see a 'one-click' installer to by-pass the next steps but a least this method allows you to change 'in/out' the individual libraries if there is are updates using the usual 'sudo apt update && sudo apt upgrade'.
http://www.paulshapley.com/2016/08/qgis-server-bringing-map-into-browser.html
http://www.paulshapley.com/2016/07/how-to-install-qgis-server-on-ubuntu.html
http://www.paulshapley.com/2016/04/how-to-install-postgresql-95-and.html
1. Firstly...Create a new QGIS project, add your layers from PostGIS, Shapefiles or raster (geotiff), style and symbolise those layers, set the projection and ensure you've set up your 'OWS Server' in 'Project Properties'.
2. Let's install the 'Lizmap' Plugin first by going into the 'Plugins' menu then 'Manage and Install Plugins', then type in 'Lizmap' in the Search bar.
3. Tick the 'Lizmap' plugin and 'Install'.
4. Go back to 'Project Properties' and in the 'General' tab ensure 'save path' is now set to 'relative'.
5. Next... click on 'Lizmap' under the 'web' menu and set all the tabs similar to below. Your choices here will activate the relevant tools in the browser when we get to the lizmap-web-client later.
Now click on the 'Map' tab and tick the 'map tools' that you want in your map browser. Set the scales you need separated with a comma (integer's only). You can set the 'Initial map extent' to the 'map canvas' option.
Then we move onto the 'baselayers' tab. Set as many map options as you like.
Next the 'Tools' tab. In here i would just worry about adding your attribute layers in the bottom block (below).
We can miss on the 'FTP' tab because this is no longer used. In the 'Log' tab (below) you just need to click 'Save' and read the generated log to ensure it is successful.
Once you 'Save' in the 'Lizmap' plugin a file with the same name as your project file e.g. 'southuk.qgs.cfg' this will now go with your qgis project file to be saved in '/home/some_directory/southuk.qgs'.
Installation of the Lizmap Web Client
6. Go to the following url:-
https://github.com/3liz/lizmap-web-client
Click on 'Branch Master' and in the dropdown select 'release_3_0' the repository will now change to the files in the '_3_0' release.
Click 'clone or download' then 'Download ZIP'. Extract the ZIP file into any folder. You now have a folder entitled 'lizmap-web-client-release_3_0' now we need to move it onto our Apache2 Server folder.
In order to do this we need 'gksudo' (which means 'home'=/root) in order to access the Apache2 server folders. In the terminal enter:-
$ gksudo nautilus
You will then be asked for your 'root' password. You are then free to add your 'lizmap-web-client-release_3_0' into '/var/www'
'Exit' Nautilus when done on the command line.
Now we link the lizmap client into the apache2 server 'html' directory so it is available in a standard browser a little later on.
$ sudo ln -s /var/www/lizmap-web-client-release_3_0/lizmap/www/ /var/www/html/lm
$ cd /var/www/lizmap-web-client-release_3_0
$ sudo lizmap/install/set_rights.sh www-data www-data
$ cd /var/www/lizmap-web-client-release_3_0/lizmap/var/config
$ sudo cp lizmapConfig.ini.php.dist lizmapConfig.ini.php
$ sudo cp localconfig.ini.php.dist localconfig.ini.php
$ sudo cp profiles.ini.php.dist profiles.ini.php
$ cd ../../..
7. Now we can activate the php installer but make sure before this you install php5.6 or php7.0 with the following additional modules:-
$ sudo apt install xauth htop curl libapache2-mod-php7.0 php7.0-cgi php7.0-gd php7.0-sqlite3 php7.0-xml php7.0-curl php7.0-xmlrpc php7.0-pgsql python-simplejson python-software-properties
then:-
$ sudo php lizmap/install/installer.php
Installation start..
[notice] Installation starts for the entry point index
All modules dependencies are ok
Module jelix installed
Module jauthdb_admin installed
Module master_admin installed
Module jacl2 installed
Module jacl2db installed
Module jacl2db_admin installed
Module jauth installed
Module jauthdb installed
Module admin installed
Module lizmap installed
Module view installed
Module proj4php installed
All modules are installed or upgraded for the entry point index
[notice] Installation starts for the entry point admin
All modules dependencies are ok
Module jelix installed
Module jauthdb_admin installed
Module master_admin installed
Module jacl2 installed
Module jacl2db installed
Module jacl2db_admin installed
Module jauth installed
Module jauthdb installed
Module admin installed
Module lizmap installed
Module view installed
Module proj4php installed
All modules are installed or upgraded for the entry point admin
[notice] Installation starts for the entry point script
All modules dependencies are ok
Module jelix installed
Module jauthdb_admin installed
Module master_admin installed
Module jacl2 installed
Module jacl2db installed
Module jacl2db_admin installed
Module jauth installed
Module jauthdb installed
Module admin installed
Module lizmap installed
Module view installed
Module proj4php installed
All modules are installed or upgraded for the entry point script
Installation ended.
$ sudo service apache2 restart
8. You need to enable the QGIS 'Demo' repository.
$ cd /var/www/lizmap-web-client-release_3_0/lizmap/var/config
$ sudo gedit localconfig.ini.php
#add the lines:-
[modules]
lizmap.installparam=demo
'Save'...then re-run the 'installer.php' as before:
$ sudo php /lizmap/install/installer.php
$ sudo service apache2 restart
Give the appropriate to directories and files
9. $ cd /var/www/lizmap-web-client-release_3_0
$ sudo chown :www-data temp/ lizmap/var/ lizmap/www lizmap/install/qgis/edition/ -R
$ sudo chmod 775 temp/ lizmap/var/ lizmap/www lizmap/install/qgis/edition/ -R
$ sudo service apache2 restart
** At this point it may be that you want to use the Lizmap web client directly on a production server, in which case you would need the installation of some extra php modules necessary for production. If so i recommend following the instruction in the following reference.
Configuring the map server for Lizmap-web-client
http://docs.3liz.com/en/admin_guide/installation/server_configuration.html
My 'Project' Folder
Configuring the Lizmap Web Client
10. Go to your favourite browser and type the url:-
http://localhost/lm
If you don't get a 'connect' page (as below) and instead you see this error:-
process(new jClassicRequest());
or this:-
It means that your PHP install is not correctly 'interpreted'. You will need to remove the library 'libapache2-mod-php7.0' then install it again before you restart apache with the usual 'sudo service apache2 restart'. It is also a good idea to remove the browser cache too. Then when that is done retype:
http://localhost/lm
11. If you click on the 'Connect' button on the top right corner you will be asked for login details in which you can enter 'admin' as 'login' and as 'password'.
12. Go back to the top right corner and click on the 'admin' button and select 'My account' and click on 'Lizmap configuration' in the left hand list as below.
13. Scroll down this page and you will see the 'Repository' settings. Here you can set the 'local folder' of the 'QGIS' demo as:-
/var/www/lizmap-web-client-release_3_0/lizmap/install/qgis/
Set all the 'rights' to 'admins' for now. If all goes well when you click on 'View' you should see the project as a thumbnail image.
14. Now create a second 'Repository' with the 'local folder' set to (in my case)
/usr/lib/cgi-bin/project/
** It's important to remember the last '/' at the end of the folder path location.
If all goes well when you select the 'Project' button (top right) you should see your two projects listed one under the other.
15. Just click on one of the Projects and you go into your map view. Now you can see that your layers are the same as in QGIS project. If you make any changes in your project file and save it... simply refresh the browser for the changes to update on your web map.
Go on...experiment, change some themes in your qgis project and see the changes when you refresh your browser. You can for example create a group of layers to appear in the 'Overview' Map in the bottom right corner.
For more information about further customisations to the Lizmap Web Client see:-
http://docs.3liz.com/en/index.html
Please email me if you need help installing the client or any other questions.
There is no doubt that in just a short time from now we will probably see a 'one-click' installer to by-pass the next steps but a least this method allows you to change 'in/out' the individual libraries if there is are updates using the usual 'sudo apt update && sudo apt upgrade'.
http://www.paulshapley.com/2016/08/qgis-server-bringing-map-into-browser.html
http://www.paulshapley.com/2016/07/how-to-install-qgis-server-on-ubuntu.html
http://www.paulshapley.com/2016/04/how-to-install-postgresql-95-and.html
1. Firstly...Create a new QGIS project, add your layers from PostGIS, Shapefiles or raster (geotiff), style and symbolise those layers, set the projection and ensure you've set up your 'OWS Server' in 'Project Properties'.
2. Let's install the 'Lizmap' Plugin first by going into the 'Plugins' menu then 'Manage and Install Plugins', then type in 'Lizmap' in the Search bar.
3. Tick the 'Lizmap' plugin and 'Install'.
4. Go back to 'Project Properties' and in the 'General' tab ensure 'save path' is now set to 'relative'.
5. Next... click on 'Lizmap' under the 'web' menu and set all the tabs similar to below. Your choices here will activate the relevant tools in the browser when we get to the lizmap-web-client later.
![]() |
Your layer/s should already be showing in the list. |
Now click on the 'Map' tab and tick the 'map tools' that you want in your map browser. Set the scales you need separated with a comma (integer's only). You can set the 'Initial map extent' to the 'map canvas' option.
Then we move onto the 'baselayers' tab. Set as many map options as you like.
Next the 'Tools' tab. In here i would just worry about adding your attribute layers in the bottom block (below).
We can miss on the 'FTP' tab because this is no longer used. In the 'Log' tab (below) you just need to click 'Save' and read the generated log to ensure it is successful.
Once you 'Save' in the 'Lizmap' plugin a file with the same name as your project file e.g. 'southuk.qgs.cfg' this will now go with your qgis project file to be saved in '/home/some_directory/southuk.qgs'.
Installation of the Lizmap Web Client
6. Go to the following url:-
https://github.com/3liz/lizmap-web-client
Click on 'Branch Master' and in the dropdown select 'release_3_0' the repository will now change to the files in the '_3_0' release.
Click 'clone or download' then 'Download ZIP'. Extract the ZIP file into any folder. You now have a folder entitled 'lizmap-web-client-release_3_0' now we need to move it onto our Apache2 Server folder.
In order to do this we need 'gksudo' (which means 'home'=/root) in order to access the Apache2 server folders. In the terminal enter:-
$ gksudo nautilus
You will then be asked for your 'root' password. You are then free to add your 'lizmap-web-client-release_3_0' into '/var/www'
'Exit' Nautilus when done on the command line.
Now we link the lizmap client into the apache2 server 'html' directory so it is available in a standard browser a little later on.
$ sudo ln -s /var/www/lizmap-web-client-release_3_0/lizmap/www/ /var/www/html/lm
$ cd /var/www/lizmap-web-client-release_3_0
$ sudo lizmap/install/set_rights.sh www-data www-data
$ cd /var/www/lizmap-web-client-release_3_0/lizmap/var/config
$ sudo cp lizmapConfig.ini.php.dist lizmapConfig.ini.php
$ sudo cp localconfig.ini.php.dist localconfig.ini.php
$ sudo cp profiles.ini.php.dist profiles.ini.php
$ cd ../../..
7. Now we can activate the php installer but make sure before this you install php5.6 or php7.0 with the following additional modules:-
$ sudo apt install xauth htop curl libapache2-mod-php7.0 php7.0-cgi php7.0-gd php7.0-sqlite3 php7.0-xml php7.0-curl php7.0-xmlrpc php7.0-pgsql python-simplejson python-software-properties
then:-
$ sudo php lizmap/install/installer.php
Installation start..
[notice] Installation starts for the entry point index
All modules dependencies are ok
Module jelix installed
Module jauthdb_admin installed
Module master_admin installed
Module jacl2 installed
Module jacl2db installed
Module jacl2db_admin installed
Module jauth installed
Module jauthdb installed
Module admin installed
Module lizmap installed
Module view installed
Module proj4php installed
All modules are installed or upgraded for the entry point index
[notice] Installation starts for the entry point admin
All modules dependencies are ok
Module jelix installed
Module jauthdb_admin installed
Module master_admin installed
Module jacl2 installed
Module jacl2db installed
Module jacl2db_admin installed
Module jauth installed
Module jauthdb installed
Module admin installed
Module lizmap installed
Module view installed
Module proj4php installed
All modules are installed or upgraded for the entry point admin
[notice] Installation starts for the entry point script
All modules dependencies are ok
Module jelix installed
Module jauthdb_admin installed
Module master_admin installed
Module jacl2 installed
Module jacl2db installed
Module jacl2db_admin installed
Module jauth installed
Module jauthdb installed
Module admin installed
Module lizmap installed
Module view installed
Module proj4php installed
All modules are installed or upgraded for the entry point script
Installation ended.
$ sudo service apache2 restart
8. You need to enable the QGIS 'Demo' repository.
$ cd /var/www/lizmap-web-client-release_3_0/lizmap/var/config
$ sudo gedit localconfig.ini.php
#add the lines:-
[modules]
lizmap.installparam=demo
'Save'...then re-run the 'installer.php' as before:
$ sudo php /lizmap/install/installer.php
$ sudo service apache2 restart
Give the appropriate to directories and files
9. $ cd /var/www/lizmap-web-client-release_3_0
$ sudo chown :www-data temp/ lizmap/var/ lizmap/www lizmap/install/qgis/edition/ -R
$ sudo chmod 775 temp/ lizmap/var/ lizmap/www lizmap/install/qgis/edition/ -R
$ sudo service apache2 restart
** At this point it may be that you want to use the Lizmap web client directly on a production server, in which case you would need the installation of some extra php modules necessary for production. If so i recommend following the instruction in the following reference.
Configuring the map server for Lizmap-web-client
http://docs.3liz.com/en/admin_guide/installation/server_configuration.html
My 'Project' Folder
![]() |
The is an image taken from my project in QGIS named 'southuk.qgs.png' which is used as the 'thumbnail' image in the Lizmap Web Client also added to the folder. |
Configuring the Lizmap Web Client
10. Go to your favourite browser and type the url:-
http://localhost/lm
If you don't get a 'connect' page (as below) and instead you see this error:-
process(new jClassicRequest());
or this:-
It means that your PHP install is not correctly 'interpreted'. You will need to remove the library 'libapache2-mod-php7.0' then install it again before you restart apache with the usual 'sudo service apache2 restart'. It is also a good idea to remove the browser cache too. Then when that is done retype:
http://localhost/lm
![]() |
If you see this start page 'it works'... |
11. If you click on the 'Connect' button on the top right corner you will be asked for login details in which you can enter 'admin' as 'login' and as 'password'.
![]() |
Enter 'admin' in both login and password...you can change these later |
12. Go back to the top right corner and click on the 'admin' button and select 'My account' and click on 'Lizmap configuration' in the left hand list as below.
![]() |
This shows your pre-set services. |
13. Scroll down this page and you will see the 'Repository' settings. Here you can set the 'local folder' of the 'QGIS' demo as:-
/var/www/lizmap-web-client-release_3_0/lizmap/install/qgis/
Set all the 'rights' to 'admins' for now. If all goes well when you click on 'View' you should see the project as a thumbnail image.
14. Now create a second 'Repository' with the 'local folder' set to (in my case)
/usr/lib/cgi-bin/project/
** It's important to remember the last '/' at the end of the folder path location.
If all goes well when you select the 'Project' button (top right) you should see your two projects listed one under the other.
![]() |
Both 'Repositories' should be showing if you've set the 'local folders' correctly and 'saved' without any errors. |
15. Just click on one of the Projects and you go into your map view. Now you can see that your layers are the same as in QGIS project. If you make any changes in your project file and save it... simply refresh the browser for the changes to update on your web map.
Go on...experiment, change some themes in your qgis project and see the changes when you refresh your browser. You can for example create a group of layers to appear in the 'Overview' Map in the bottom right corner.
For more information about further customisations to the Lizmap Web Client see:-
http://docs.3liz.com/en/index.html
Please email me if you need help installing the client or any other questions.