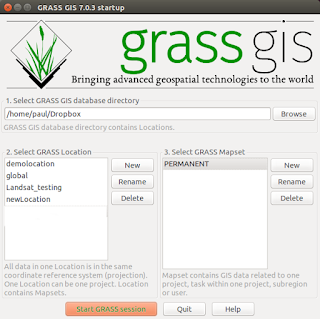
GRASS GIS is an extremely powerful application for manipulating and modelling large raster datasets such as Landsat 8 tiff bands. As GRASS users we are aware the application does not implement 'on-the-fly-projections' to ease the pain when adding data in a different projection in the way QGIS does.
The grass developers insist doing so would introduce artifacts and some distortions when taking measurements off the overlayed data, so we have to deal with a 'one location = one projection/zone/datum/ellipsoid' combination.
How do we get our raster images to underlay or overlay our vectors? The golden rule when using GRASS is if in doubt create a new 'location' any time you want to import or use data in a different projection.
I mainly work with just two projections, EPSG:27700 (OSGB36) and EPSG:4326 (WGS 84) and In my case I would define two locations and associated mapsets, one for my everyday working projects in (OSGB36 here in the UK) and one for my working landsat data in (WGS84).
can easily change between these two locations any time and re-project (r.proj) data from one the other. For example I would simply open the (OSGB36) location and use (r.proj) module to overlay data from the (WGS84) location. Lets look at how this is done.
1. Let's open a GRASS GIS session and create our first new 'location' and 'mapset' for our (OSGB36) location using the 'Grass Location Wizard'. This will be my everyday working project location here in the UK.
![]() |
When the 'Splash' screen opens click on the left 'New' location button |
![]() |
Select first (default) option then Click 'Next' |
![]() | ||
Use the magnifier to find your code if you know it. |
![]() |
Select the option 'Used in Great Britain' |
![]() |
That's it... the 'Summary' confirms success. |
![]() |
Ignore the fact this is showing 'OSGB362' yours will show 'OSGB36' |
2. Import your vector data into it with 'v.in.ogr' in the normal way.
![]() | |||
I'm only going to import one layer from my 'sqlite' database stored inside my 'PERMANENT' directory. |
![]() |
Zoom to the full extent of your layer simply to check it is viewable in the projection. |
3. Create a second 'location' and 'mapset' (projection code = 'utm' datum code = 'wgs84') the same as in part 1. above.
4. Import all your landsat bands (into WGS84) using 'v.in.ogr' specifying 'override projection use locations projection' this will be your working landsat project location.
![]() |
Again Zoom to the full extent of your layer to check it is viewable in this projection. |
5. Change back to the 'OSGB36' location and mapset and display your vector data in a display window. Go into 'settings' > 'GRASS working environment' > 'Change Location & mapset' you will then see this:-
![]() |
Change the 'location' to OSGB36 and 'mapset' to 'PERMANENT' |
![]() |
Click on the '-' magnifier about 4/5 times. |
8. 'r.proj' your Landsat image/s you wish to overlap enter text as below and then hit 'RUN'.
![]() |
Source Tab is 'WGS84' and 'PERMANENT' and the 'Input' is the raster you wish to load across into the 'OSGB36' projection. |
![]() |
Target Tab - leave output raster blank, leave interpolation as 'nearest' and add the resolution to 15m (this may be 30m) depending on what yours is. |
Important note:-
If we import (instead of project) any new raw landsat images through 'v.in.ogr' whilst inside the 'OSGB36' location the new images will misalign vertically because these images are still hardcoded to their 'WGS84' projection/datum parameters even though we are importing them into a 'OSGB36' projection.
This can cause a lot of frustration for new users who may be used to 'on-the-fly-projections'.
THE GOLDEN RULE: Small 'extents' fit into bigger 'extents', Bigger 'extents' will not fit into smaller 'extents'.
If we import (instead of project) any new raw landsat images through 'v.in.ogr' whilst inside the 'OSGB36' location the new images will misalign vertically because these images are still hardcoded to their 'WGS84' projection/datum parameters even though we are importing them into a 'OSGB36' projection.
![]() |
Notice the vertical misaligned vector data in the bottom of the window because i have 'imported' the landsat image (WGS84) (top) into 'OSGB36' location. |
THE GOLDEN RULE: Small 'extents' fit into bigger 'extents', Bigger 'extents' will not fit into smaller 'extents'.
Further reading:-
https://grasswiki.osgeo.org/wiki/Location_and_Mapsets
https://grasswiki.osgeo.org/wiki/GRASS_Location_Wizard
https://grasswiki.osgeo.org/wiki/Map_Reprojection
------------------------------------------------------------------------
If you wish to check your grass environment files (those which control your Grass session in the 'PERMANENT' directory) you can use the following as a guide for checking. In other words the contents of your 'WIND', 'DEFAULT_WIND', 'PROJ_EPSG', 'PROJ_INFO and 'PROJ_UNITS' files if using Landsat images.
Checking your settings (optional) for 'OSGB36' projection.
type 'g.gisenv -n' in the command console.
MAPSET=PERMANENT
GISDBASE=/home/paul/Dropbox
LOCATION_NAME=OSGB36
GUI=wxpython
type 'g.region -p' in the command console.
projection: 99 (Transverse Mercator)
zone: 0
datum: osgb36
ellipsoid: airy
north: 324535
south: 77919
west: 128407
east: 371768
nsres: 29.99829704
ewres: 30.00012327
rows: 8221
cols: 8112
cells: 66688752
WIND (file)
proj: 99
zone: 0
north: 324535
south: 77919
east: 371768
west: 128407
cols: 8112
rows: 8221
e-w resol: 30.00012327
n-s resol: 29.99829704
top: 1.000000000000000
bottom: 0.000000000000000
cols3: 8112
rows3: 8221
depths: 1
e-w resol3: 30.00012327
n-s resol3: 29.99829704
t-b resol: 1
DEFAULT_WIND (file)
proj: 99
zone: 0
north: 1
south: 0
east: 1
west: 0
cols: 1
rows: 1
e-w resol: 1
n-s resol: 1
top: 1.000000000000000
bottom: 0.000000000000000
cols3: 1
rows3: 1
depths: 1
e-w resol3: 1
n-s resol3: 1
t-b resol: 1
PROJ_EPSG
epsg: 27700
PROJ_INFO (file)
name: Transverse Mercator
proj: tmerc
datum: osgb36
ellps: airy
lat_0: 49
lon_0: -2
k: 0.9996012717
x_0: 400000
y_0: -100000
no_defs: defined
towgs84: 368.000,-120.000,425.000
PROJ_UNITS
unit: meter
units: meters
meters: 1
Checking your settings (optional) for 'WGS84' projection.
Type 'g.gisenv -n' in the command console
MAPSET=PERMANENT
GISDBASE=/home/paul/Dropbox
LOCATION_NAME=WGS84
GUI=wxpython
Type 'g.region -p' in the command console.
projection: 1 (UTM)
zone: 30
datum: wgs84
ellipsoid: wgs84
north: 5848815
south: 5605485
west: 299085
east: 539115
nsres: 30
ewres: 30
rows: 8111
cols: 8001
cells: 64896111
WIND (file)
proj: 1
zone: 30
north: 5848815
south: 5605485
east: 539115
west: 299085
cols: 8001
rows: 8111
e-w resol: 30
n-s resol: 30
top: 1.000000000000000
bottom: 0.000000000000000
cols3: 8001
rows3: 8111
depths: 1
e-w resol3: 30
n-s resol3: 30
t-b resol: 1
DEFAULT_WIND (file)
proj: 1
zone: 30
north: 1
south: 0
east: 1
west: 0
cols: 1
rows: 1
e-w resol: 1
n-s resol: 1
top: 1.000000000000000
bottom: 0.000000000000000
cols3: 1
rows3: 1
depths: 1
e-w resol3: 1
n-s resol3: 1
t-b resol: 1
PROJ_INFO (file)
name: Universal Transverse Mercator
proj: utm
zone: 30
no_defs: defined
datum: wgs84
ellps: wgs84
towgs84: 0.000,0.000,0.000
PROJ_UNITS (file)
unit: Meter
units: Meters
meters: 1